Client-to-Agent Authorization
This guide explains how to configure client-to-agent authorization using Microsoft Entra ID, so that only approved client applications can start sessions with your agent.
Table of Contents
- Overview
- Prerequisites
- How Client-to-Agent Authorization Works
- For Agent Owners
- Step 1 — Expose an API on Your Agent App Registration
- Step 2 — Add the
access_as_clientScope - Step 3 — Pre-Authorize Client Applications
- Step 4 — Control Authorization Enforcement
- For Client Application Owners
- What Client App Owners Need to Do
- Verification
- Frequently Asked Questions
- Next Steps
Overview
LKPS supports optional client-to-agent authorization. When enabled, LKPS verifies that a client application is explicitly allowed to connect to a specific agent before starting a session. This verification uses Microsoft Entra ID's preAuthorizedApplications mechanism.
| Concept | Description |
|---|---|
| Agent app registration | The Entra identity of your AI agent. The agent owner configures which clients are allowed. |
| Client app registration | The Entra identity of the frontend or backend application that starts sessions with agents. |
| Pre-authorized application | A client app that the agent owner has explicitly granted access to via preAuthorizedApplications. |
access_as_client scope |
A delegated permission scope exposed by the agent's app registration. Clients must be granted this scope. |
enforce_client_authz |
A flag set during agent registration. When true (default), LKPS validates client authorization. When false, any client with Ocelot access can start sessions. |
Prerequisites
Before configuring authorization, ensure you have:
- An Entra ID app registration for your agent (Prerequisites — Step 2)
- The Client ID of each client application you want to authorize (provided by the client app team)
How Client-to-Agent Authorization Works
When a client application calls POST /api/session/start, LKPS performs the following authorization check:
Client calls POST /api/session/start
  ├── body: { agent_entra_app_id: "<agent-app-id>" }
  ├── header: client-id (injected by Ocelot from the caller's JWT)
  │
  ▼
LKPS looks up the agent in the registration table
  │
  ├── Agent not found → 404 Not Found
  │
  ├── enforce_client_authz = false → Skip authorization, create session
  │
  └── enforce_client_authz = true → Continue to authorization check
        │
        ▼
      LKPS calls Microsoft Graph API:
      GET /v1.0/applications(appId='{agent-app-id}')?$select=api
        │
        ▼
      Check 1: Does the agent expose an "access_as_client" scope?
        ├── No → 403 Forbidden
        │
        ▼
      Check 2: Is the client-id listed in preAuthorizedApplications?
        ├── No → 403 Forbidden
        │
        ▼
      Check 3: Does the client entry include the access_as_client scope ID?
        ├── No → 403 Forbidden
        │
        ▼
      Authorized — session is created
For Agent Owners
If you are building an AI agent and want to control which client applications can connect to it, follow these steps.
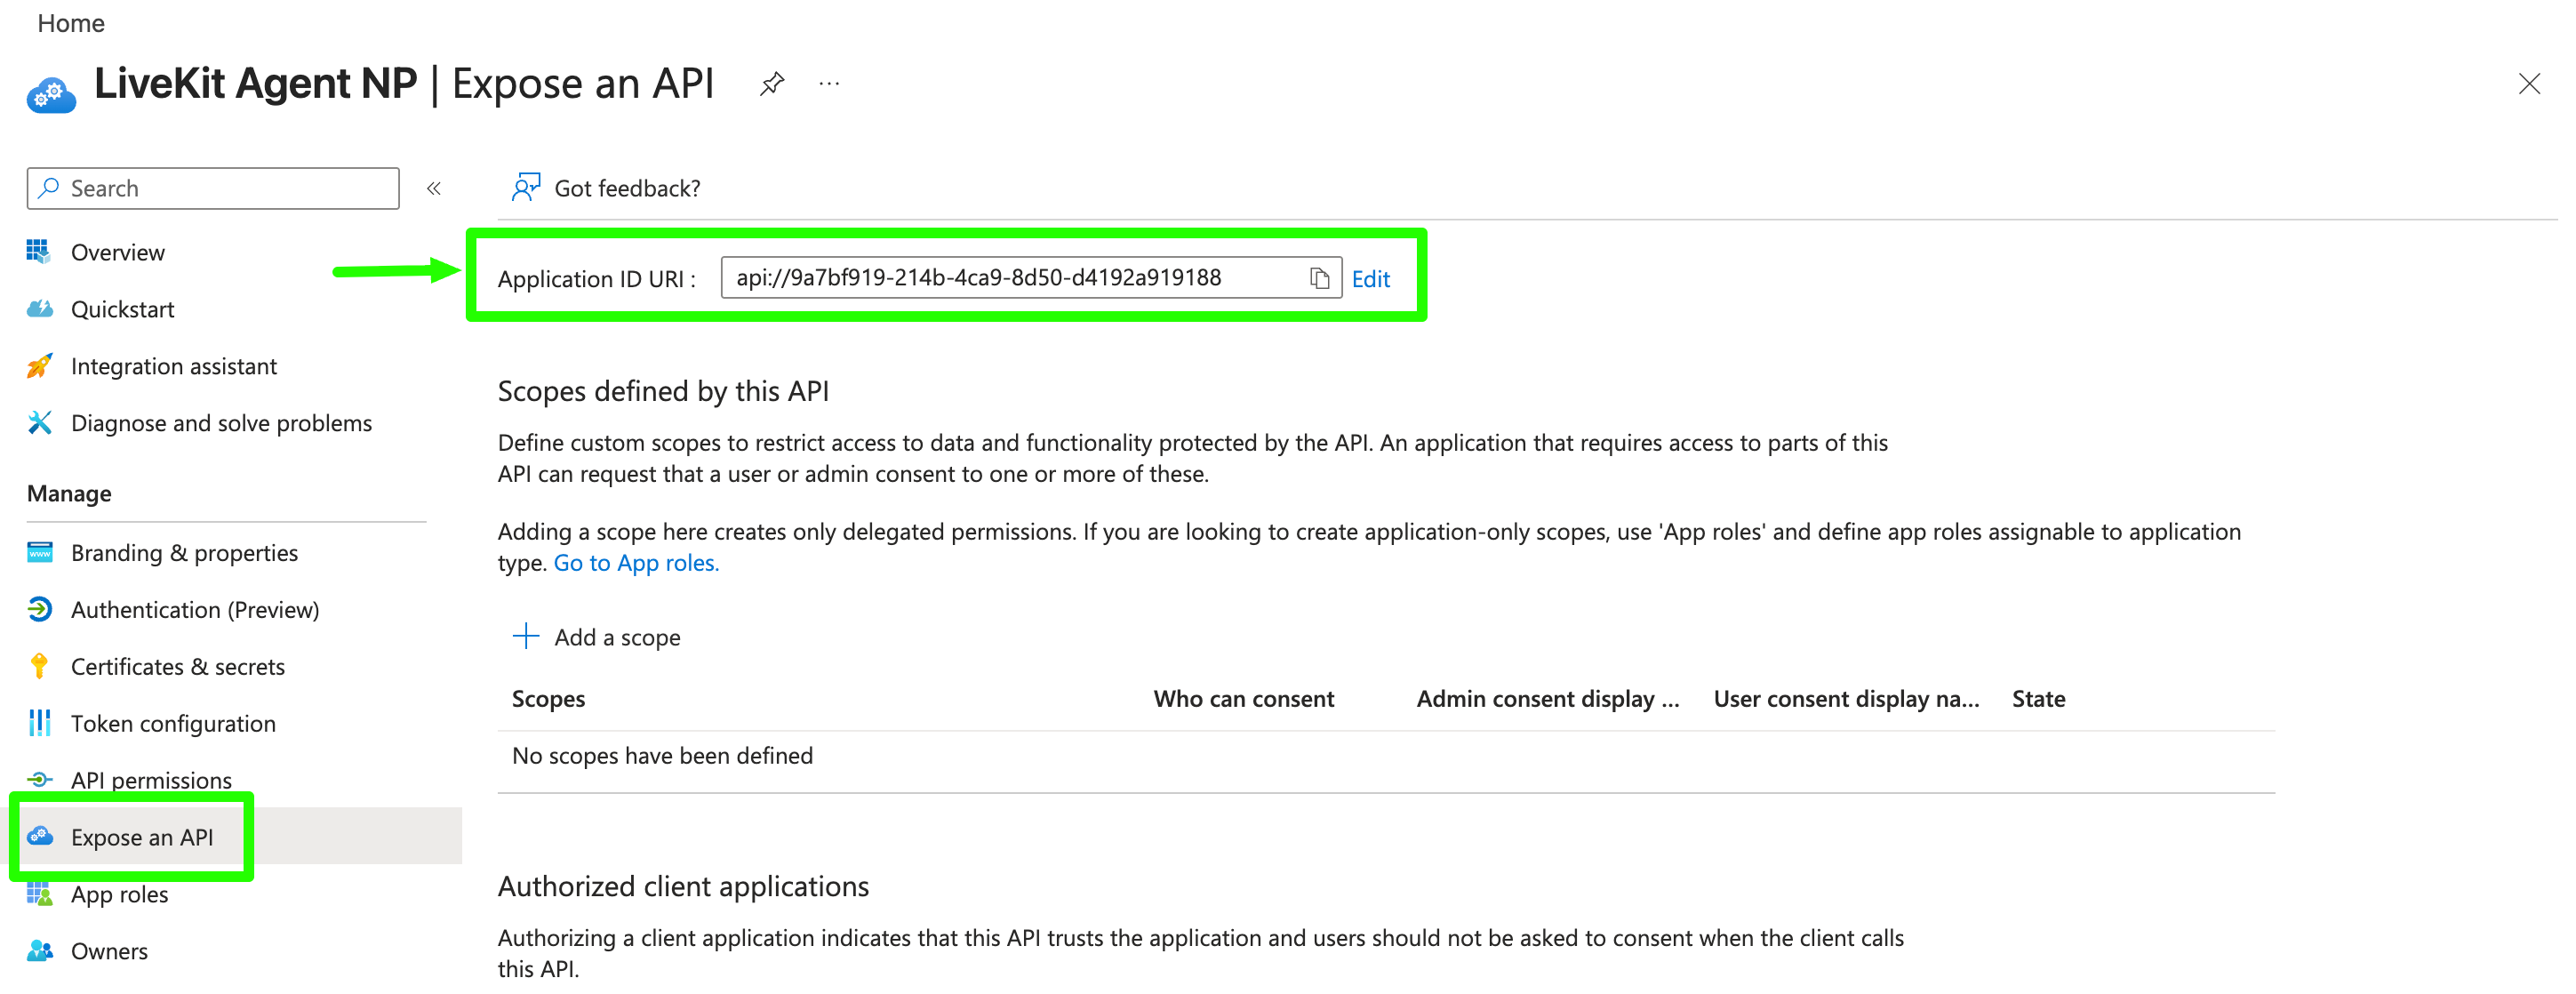
Step 1 — Expose an API on Your Agent App Registration
- Go to the Azure Portal ⧉ → Microsoft Entra ID → Manage → App registrations → select your agent's app registration. Alternatively, navigate directly to the Entra portal ⧉ → App registrations → select your agent's app.
- In the left menu, click Expose an API.
- If the Application ID URI is not set, click Set and accept the default (
api://<client-id>) or provide a custom URI.
Step 2 — Add the access_as_client Scope
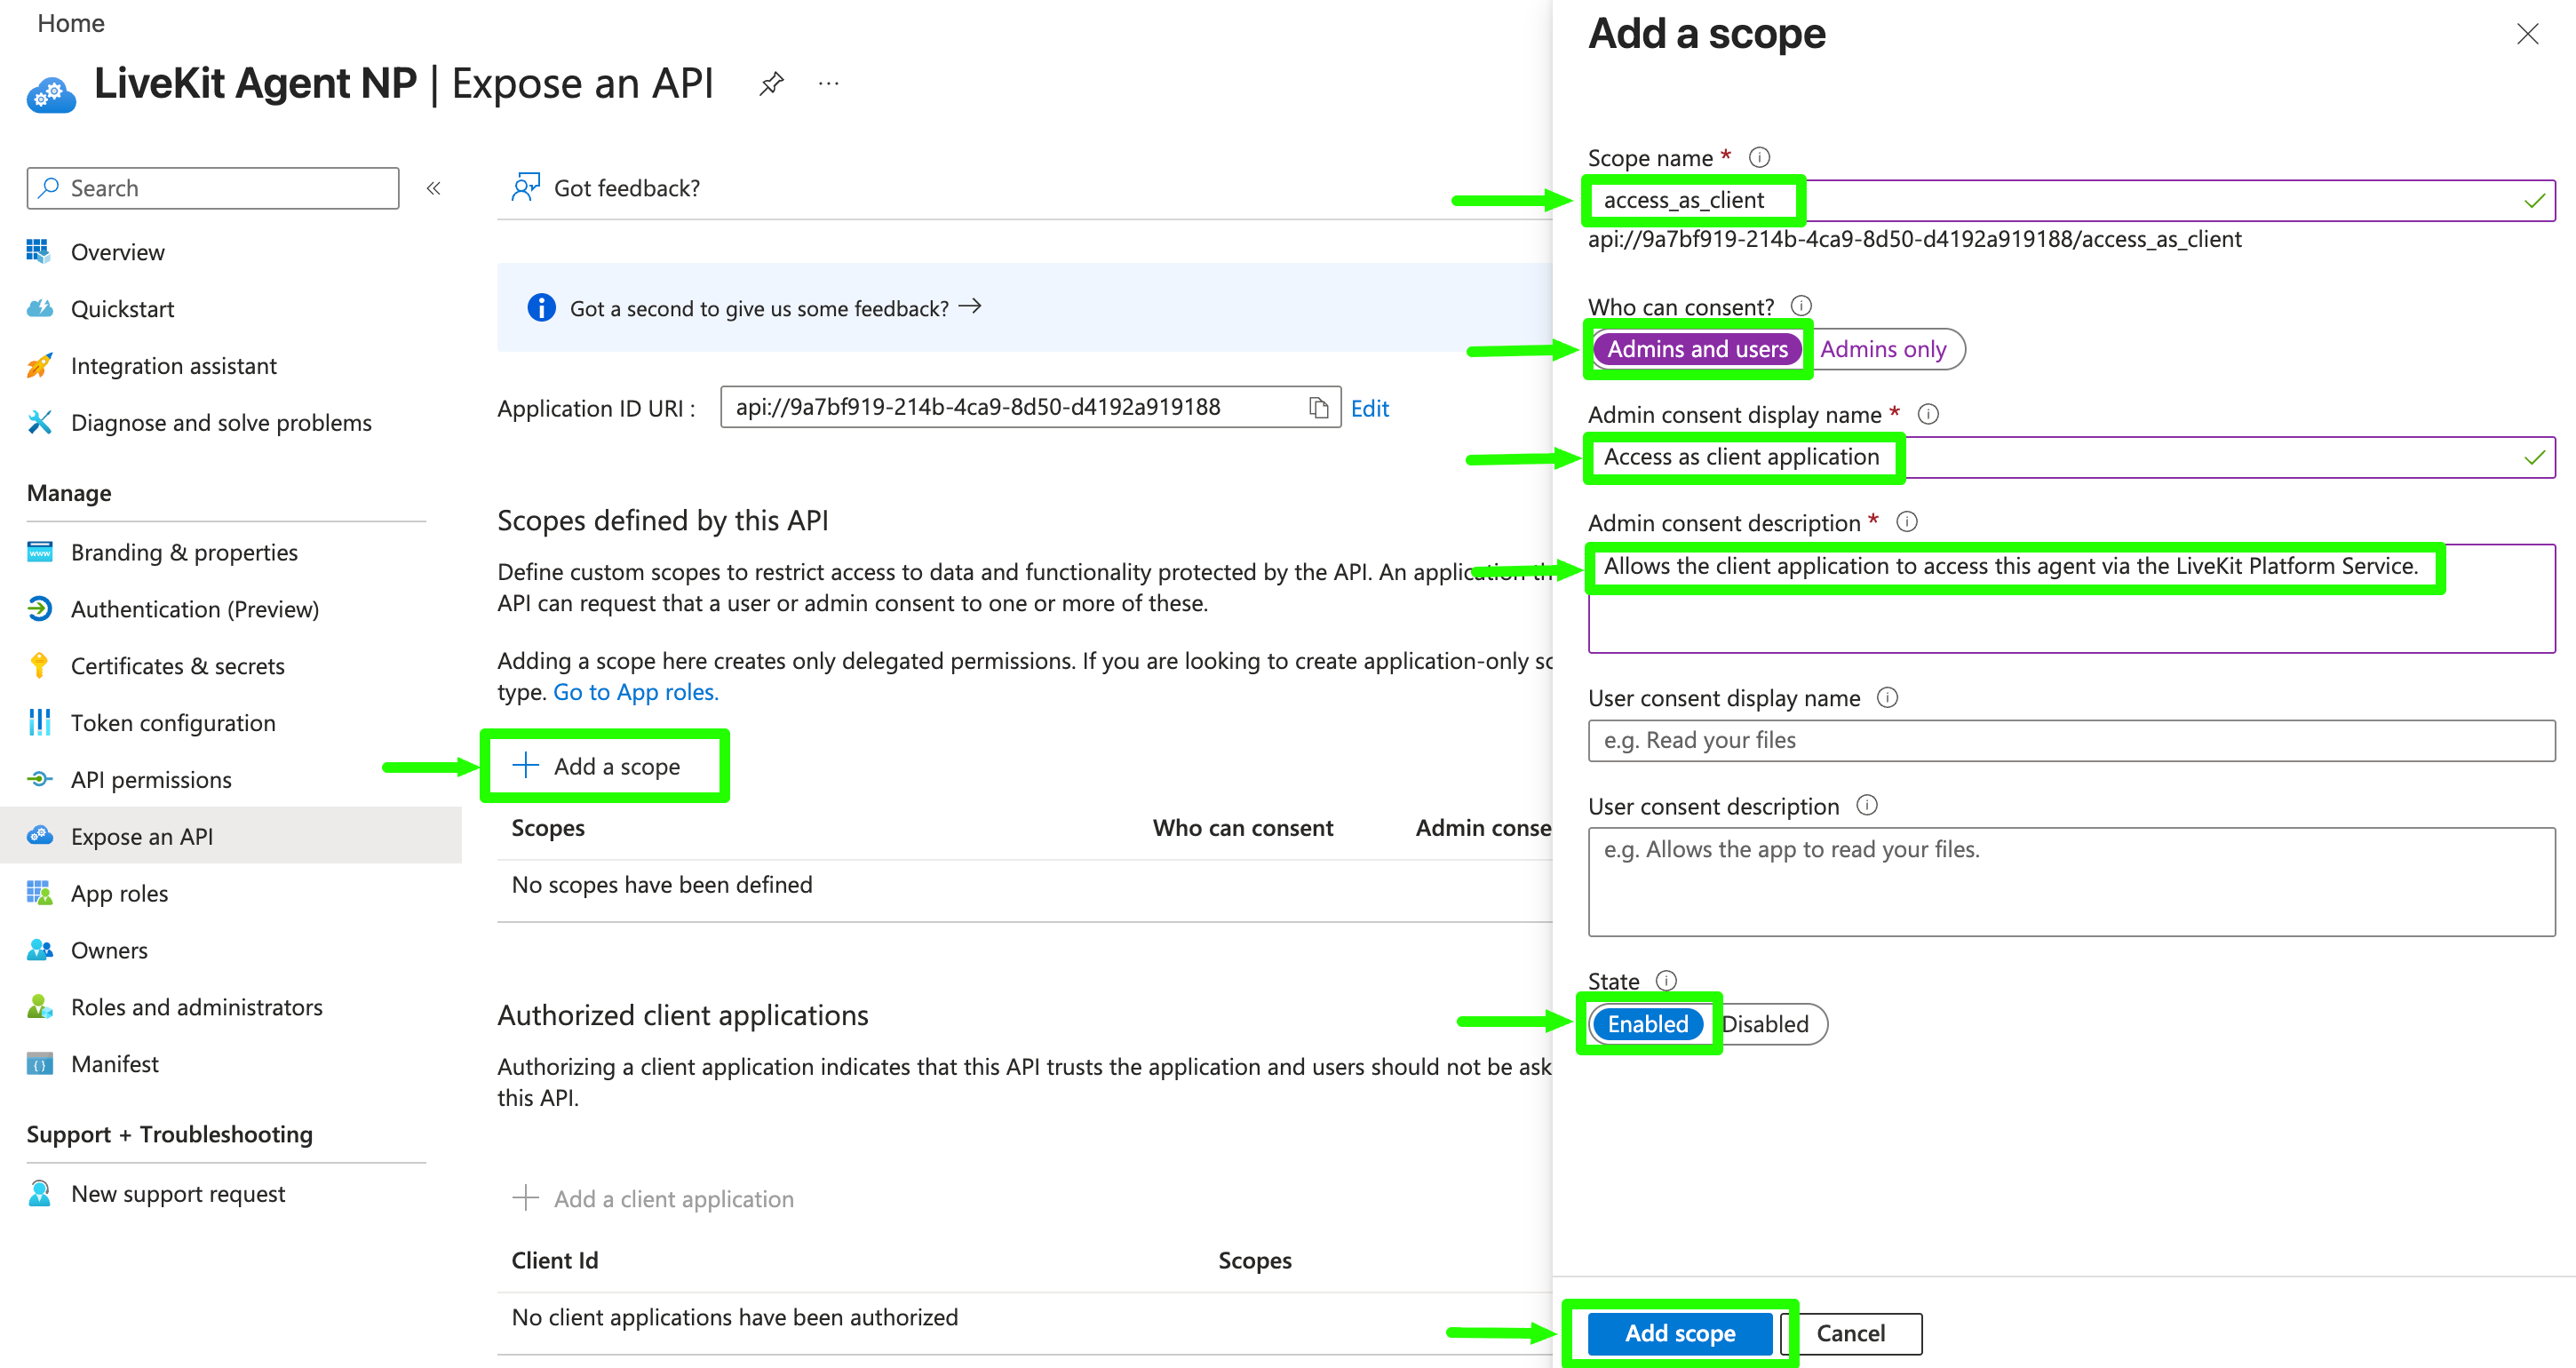
On the same Expose an API page:
- Click Add a scope.
- Fill in the following:
| Field | Value |
|---|---|
| Scope name | access_as_client |
| Who can consent? | Admins and users |
| Admin consent display name | Access as client application |
| Admin consent description | Allows the client application to access this agent via the LiveKit Platform Service. |
| State | Enabled |
- Click Add scope.
Warning
The scope name must be exactly access_as_client. This is the value LKPS looks for when verifying client authorization.
Step 3 — Pre-Authorize Client Applications
After creating the scope, you need to grant specific client applications permission to use it. On the same Expose an API page:
- Scroll down to the Authorized client applications section.
- Click Add a client application.
- Enter the Client ID (Application ID) of the client application you want to authorize.
- Check the box next to the
access_as_clientscope. - Click Add application.
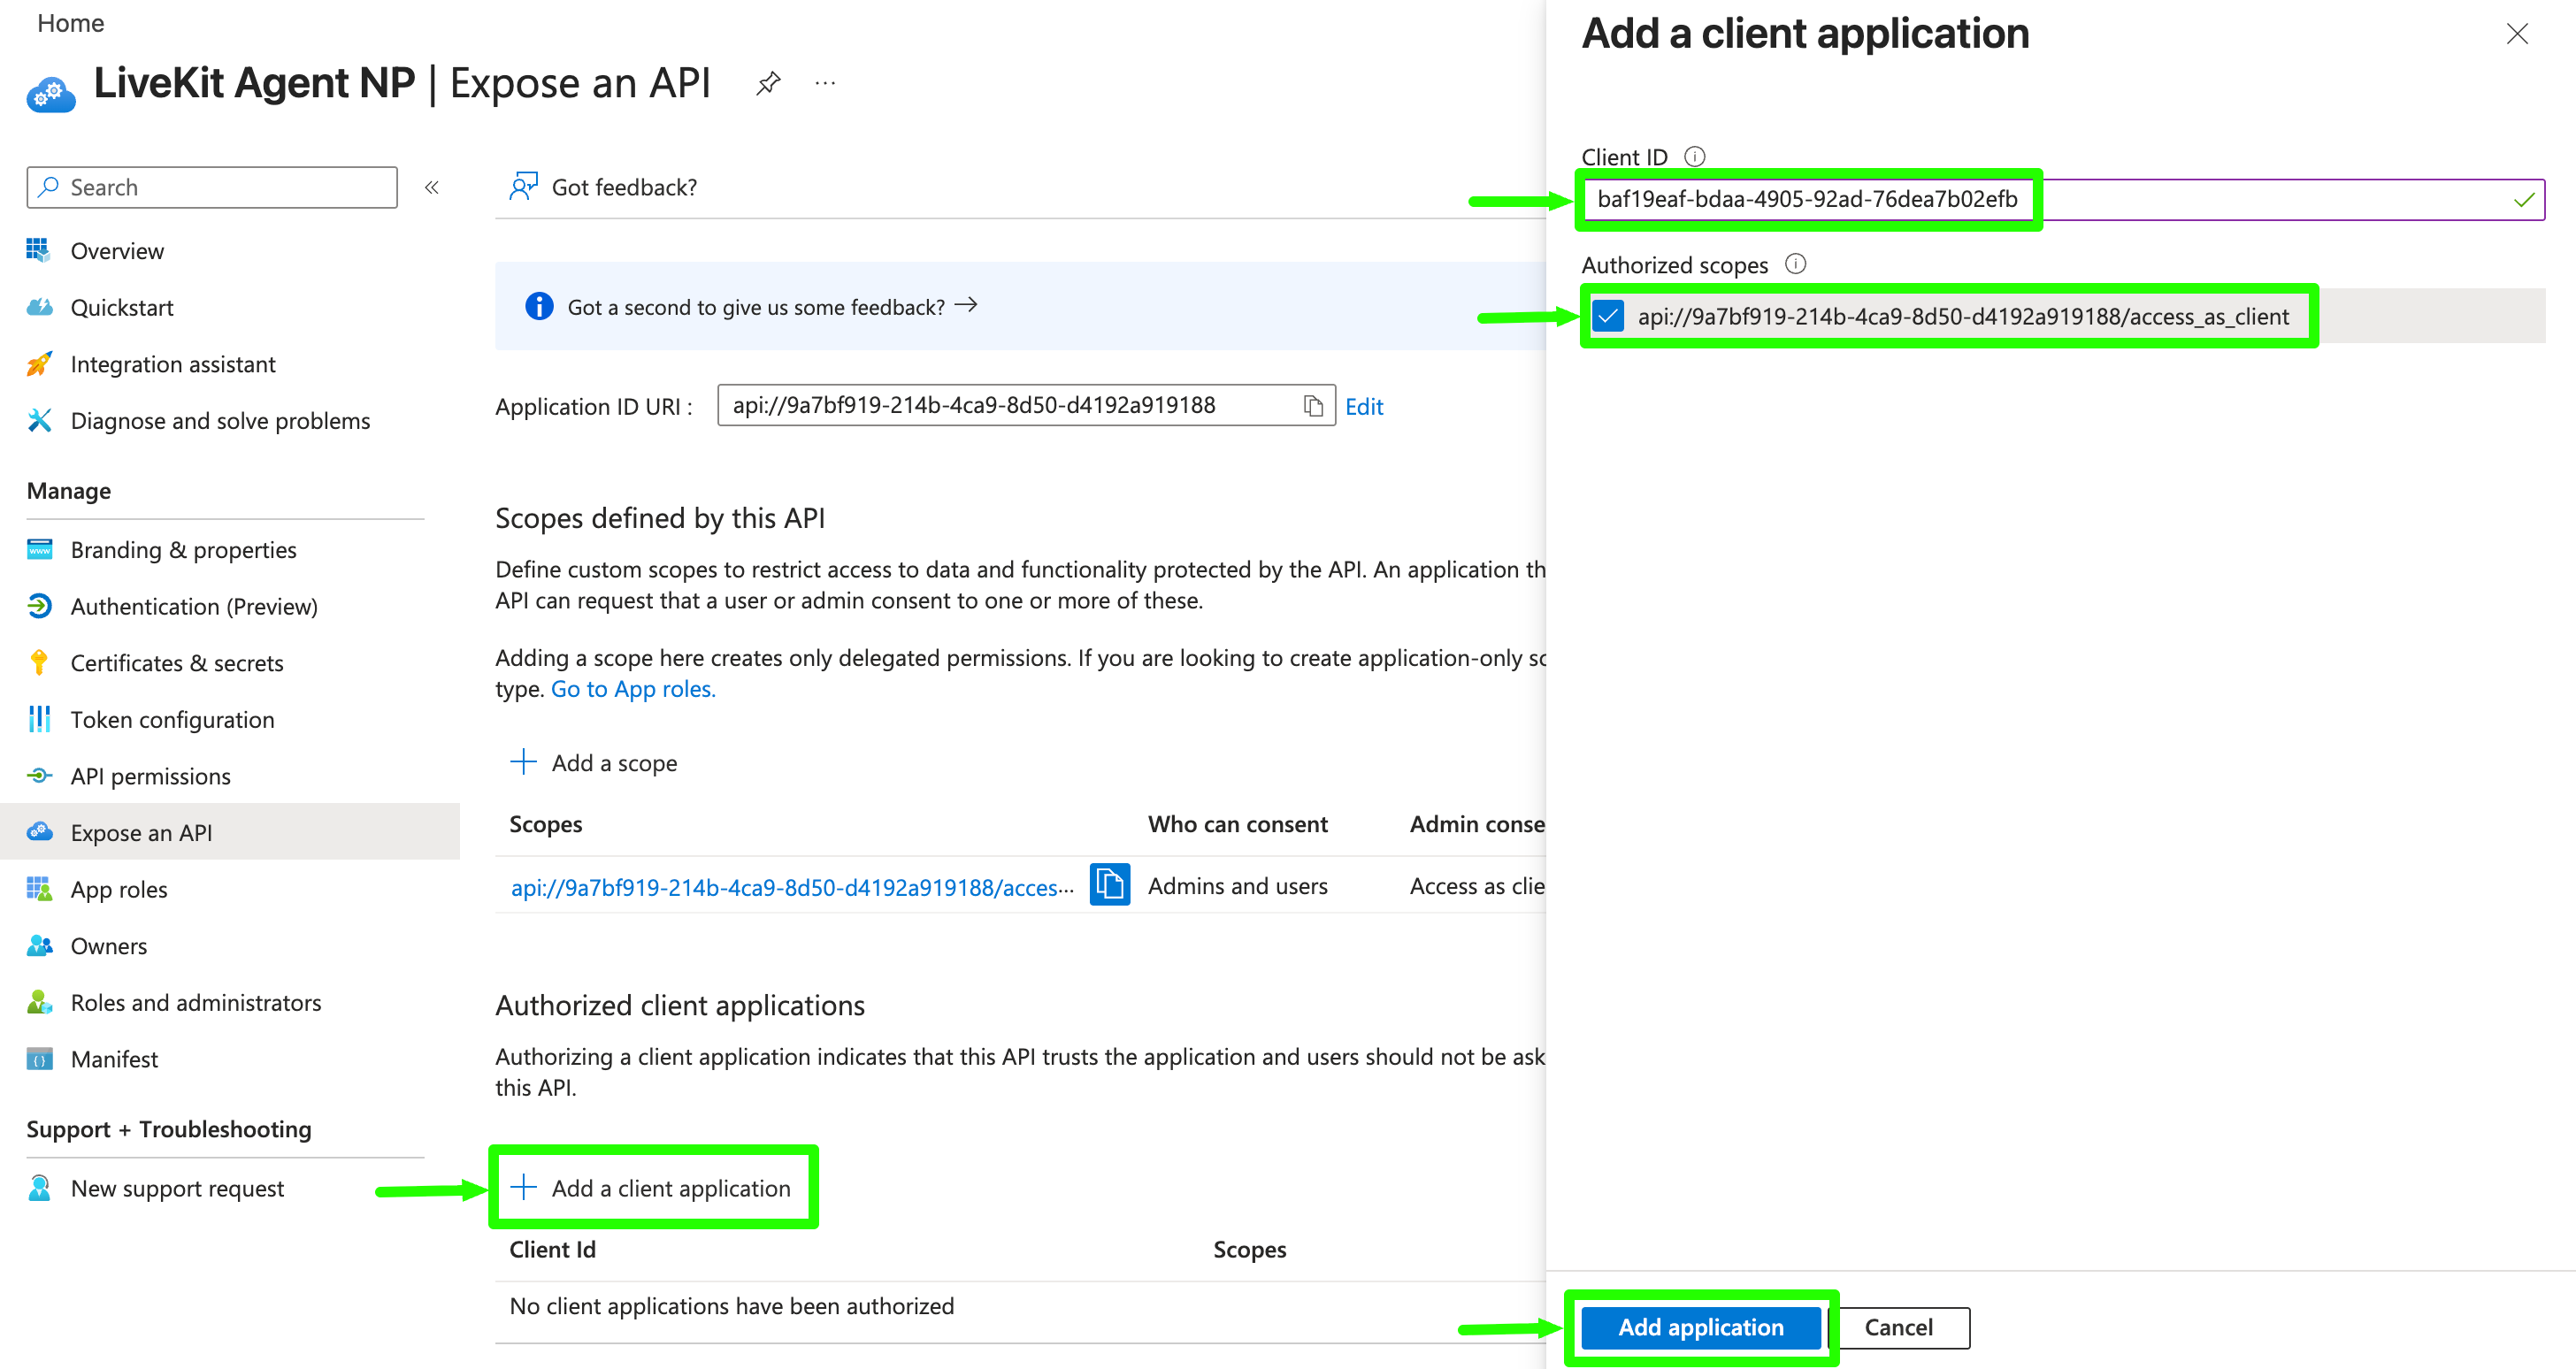
Once added, the client application will appear in the Authorized client applications list. Repeat this process for each client application that should be allowed to connect to your agent.

Step 4 — Control Authorization Enforcement
When your agent registers with LKPS (via POST /api/agent/register), you can control whether client authorization is enforced:
Default behavior (authorization enforced):
POST /api/agent/register
Content-Type: application/json

{}
When no service_config is provided, enforce_client_authz defaults to true. Only pre-authorized client applications can start sessions with your agent.
Opt out of authorization:
POST /api/agent/register
Content-Type: application/json

{
  "service_config": {
    "enforce_client_authz": false
  }
}
When enforce_client_authz is false, any client application with Ocelot access to LKPS can start sessions with your agent.
Recommendation
Keep authorization enforcement enabled (true) for production agents. Disabling it may be useful during development and testing.
For Client Application Owners
What Client App Owners Need to Do
As a client application owner, you do not need to configure any special settings on your own Entra app registration for the authorization check to work. The authorization is entirely managed on the agent's side.
Your responsibilities:
| Step | Action | Who does it |
|---|---|---|
| 1 | Create an Entra ID app registration for your client app | You (see Prerequisites) |
| 2 | Provide your Client ID to the agent owner | You |
| 3 | Agent owner adds your Client ID to preAuthorizedApplications |
Agent owner |
| 4 | Ensure your Ocelot access is configured | You — self-service via Ocelot UI |
| 5 | Include client-id header in requests to LKPS |
Automatic — Ocelot injects this from your JWT |
In short
Provide your Client ID to the agent team you want to integrate with. They will pre-authorize your application on their agent's Entra app registration.
Verification
After completing the Entra ID configuration, verify the setup:
Agent Owner Verification
- Go to Azure Portal → Microsoft Entra ID → Manage → App registrations → your agent app → Expose an API.
- Confirm the
access_as_clientscope is listed under Scopes defined by this API. - Confirm the client application's Client ID appears under Authorized client applications with the
access_as_clientscope checked.
Client App Owner Verification
- Request the agent owner to confirm your Client ID has been pre-authorized.
- Make a test call to
POST /api/session/startin the non-production environment:curl -X POST https://eu-livekit-platform-service-np.int.bayer.com/api/session/start \ -H "Authorization: Bearer <your-entra-token>" \ -H "Content-Type: application/json" \ -d '{"agent_entra_app_id": "<agent-app-id>"}' - A
200 OKresponse confirms the authorization is working. - A
403 Forbiddenresponse indicates the pre-authorization is missing or incorrectly configured.
Frequently Asked Questions
Can an agent allow all clients without authorization?
Yes. Set enforce_client_authz to false during agent registration. This is the only configuration required — no Entra API scopes or pre-authorized apps are needed.
Can multiple agents use the same Entra app registration?
Technically possible, but not recommended. Each agent should have its own Entra app registration for clear access boundaries and auditability.
What happens if an agent does not expose the access_as_client scope?
If enforce_client_authz is true but the scope is missing, all session start requests to that agent will return 403 Forbidden.
Who manages the pre-authorized client list?
The agent owner manages the list. Client application owners must communicate their Client IDs to the agent team.
Next Steps
| Next | Guide |
|---|---|
| Build an AI agent | Agent Developer Guide |
| Integrate a client application | Client Developer Guide |
| View all environment URLs | Environments & URLs |