Ocelot Access Setup
This guide explains how the Ocelot reverse proxy works with the LiveKit Platform Service (LKPS) and how to configure your application to access LKPS through Ocelot.
Table of Contents
- What is Ocelot?
- How Ocelot Works with LKPS
- Prerequisites
- Step 1 — Request Access to the LKPS Ocelot Route
- Step 2 — Configure Your Application to Call LKPS via Ocelot
- How Ocelot Authenticates Requests
- Troubleshooting
- Next Steps
What is Ocelot?
Ocelot ⧉ is Bayer's in-house reverse HTTP proxy. It provides:
- Authentication — validates Microsoft Entra ID JWT tokens on every request
- Identity injection — extracts claims from validated tokens and injects them as HTTP headers
- Access control — restricts API access to specific authorized client applications
- Infrastructure — deployed globally in both US and EU regions
LKPS uses Ocelot as its front door — all API requests to LKPS must pass through Ocelot.
Info
For full details on Ocelot concepts, configuration, and troubleshooting, see the official Ocelot documentation ⧉.
How Ocelot Works with LKPS

The flow:
- Your application obtains an Entra ID JWT token targeting the LKPS audience — use the environment-specific scope (
api://livekit-platform-service-np.int.bayer.com/.defaultfor non-prod,api://livekit-platform-service.int.bayer.com/.defaultfor prod) in the client credentials flow. - Your application sends the API request to the LKPS Ocelot URL with the token in the
Authorizationheader. - Ocelot validates the JWT signature and expiration.
- Ocelot checks that your app's client ID is in the route's Client Access List.
- Ocelot extracts identity claims from the JWT and injects them as HTTP headers.
- Ocelot forwards the request (with injected headers) to LKPS.
- LKPS processes the request using the identity headers — it does not re-validate the JWT.
Prerequisites
Before proceeding, ensure you have completed:
- BEAT registration
- Entra ID App Registration with a client ID and secret
- Ocelot Users group membership — required to view Ocelot routes. Verify or request access:
- Non-prod: devtools-np.bayer.com/profile/applications/OCELOT ⧉
- Prod: devtools.bayer.com/profile/applications/OCELOT ⧉
Step 1 — Request Access to the LKPS Ocelot Route
The LKPS Ocelot routes are already configured and managed by the Bayer LiveKit Platform Team ⧉.
This is a self-service process — simply add your application's Entra client ID to the route's Client Access List via the Ocelot UI.
Who Needs to Request Access?
| Role | Needs access to | Purpose |
|---|---|---|
| Agent developers | LKPS Ocelot route | To call /api/agent/register for agent registration |
| Client app developers | LKPS Ocelot route | To call /api/session/start for session management |
Both agent developers and client application developers follow the same self-service process described below.
1.1 — Navigate to the LKPS Route in Ocelot
Open the Ocelot route page for the environment and region you need:
| Environment | Region | Ocelot Route URL |
|---|---|---|
| Non-Prod | EU | eu-livekit-platform-service-np.int.bayer.com ⧉ |
| Non-Prod | US | us-livekit-platform-service-np.int.bayer.com ⧉ |
| Prod | EU | eu-livekit-platform-service.int.bayer.com ⧉ |
| Prod | US | us-livekit-platform-service.int.bayer.com ⧉ |
Tip
Start with a non-prod route during development. You can request prod access later when you are ready to go live.
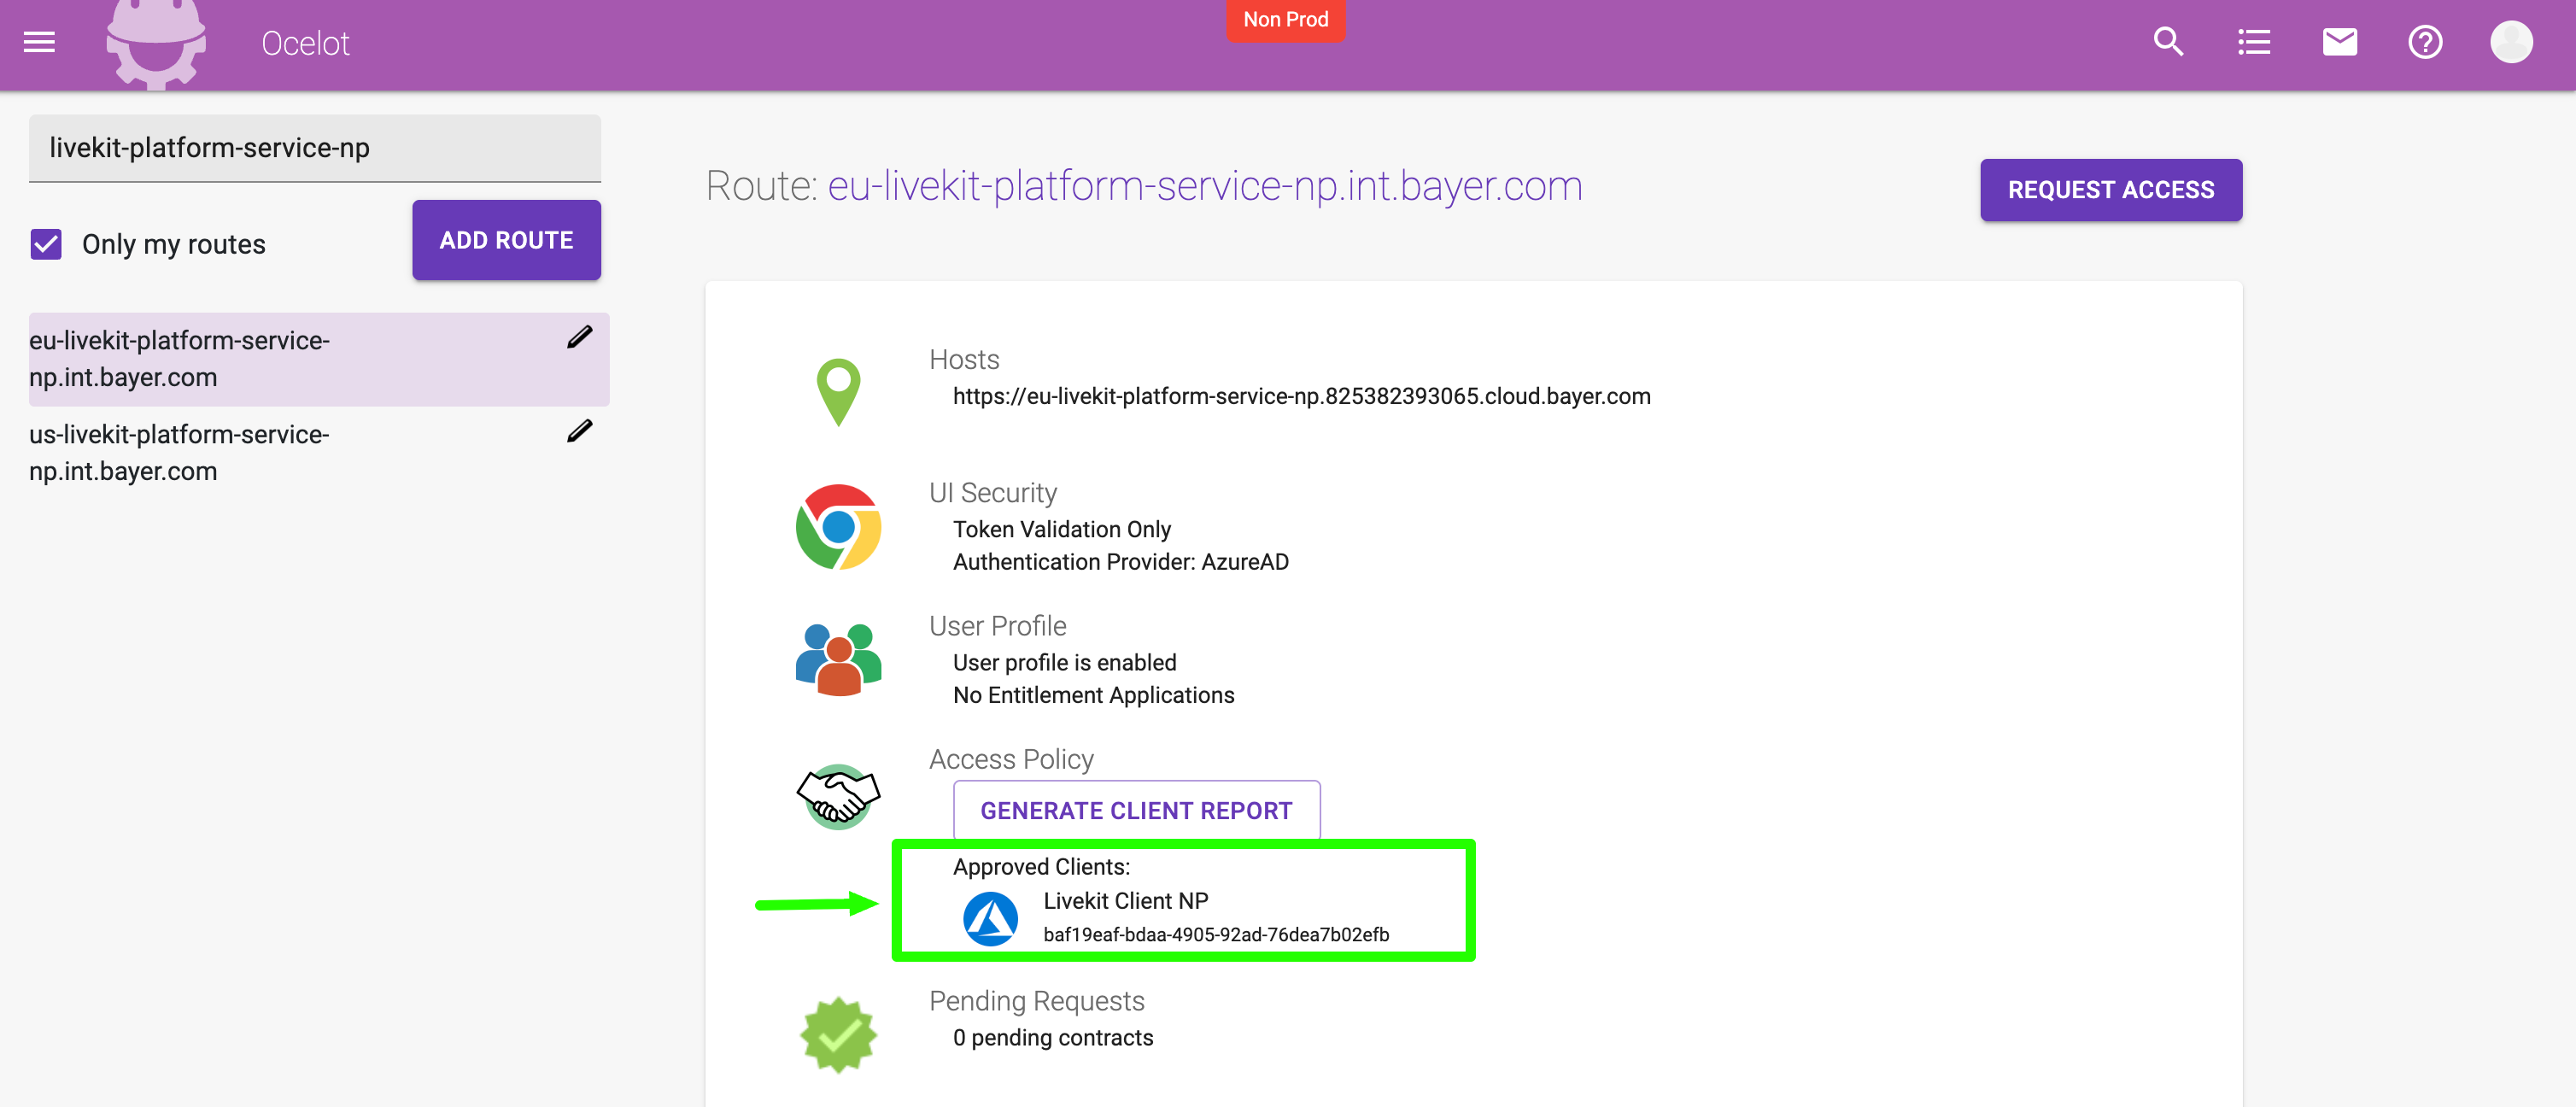
Once you open the route page, you will see the route details including the host URL, security settings, and the list of currently approved clients.
1.2 — Click "Request Access"
Click the REQUEST ACCESS button located in the top-right corner of the route page.
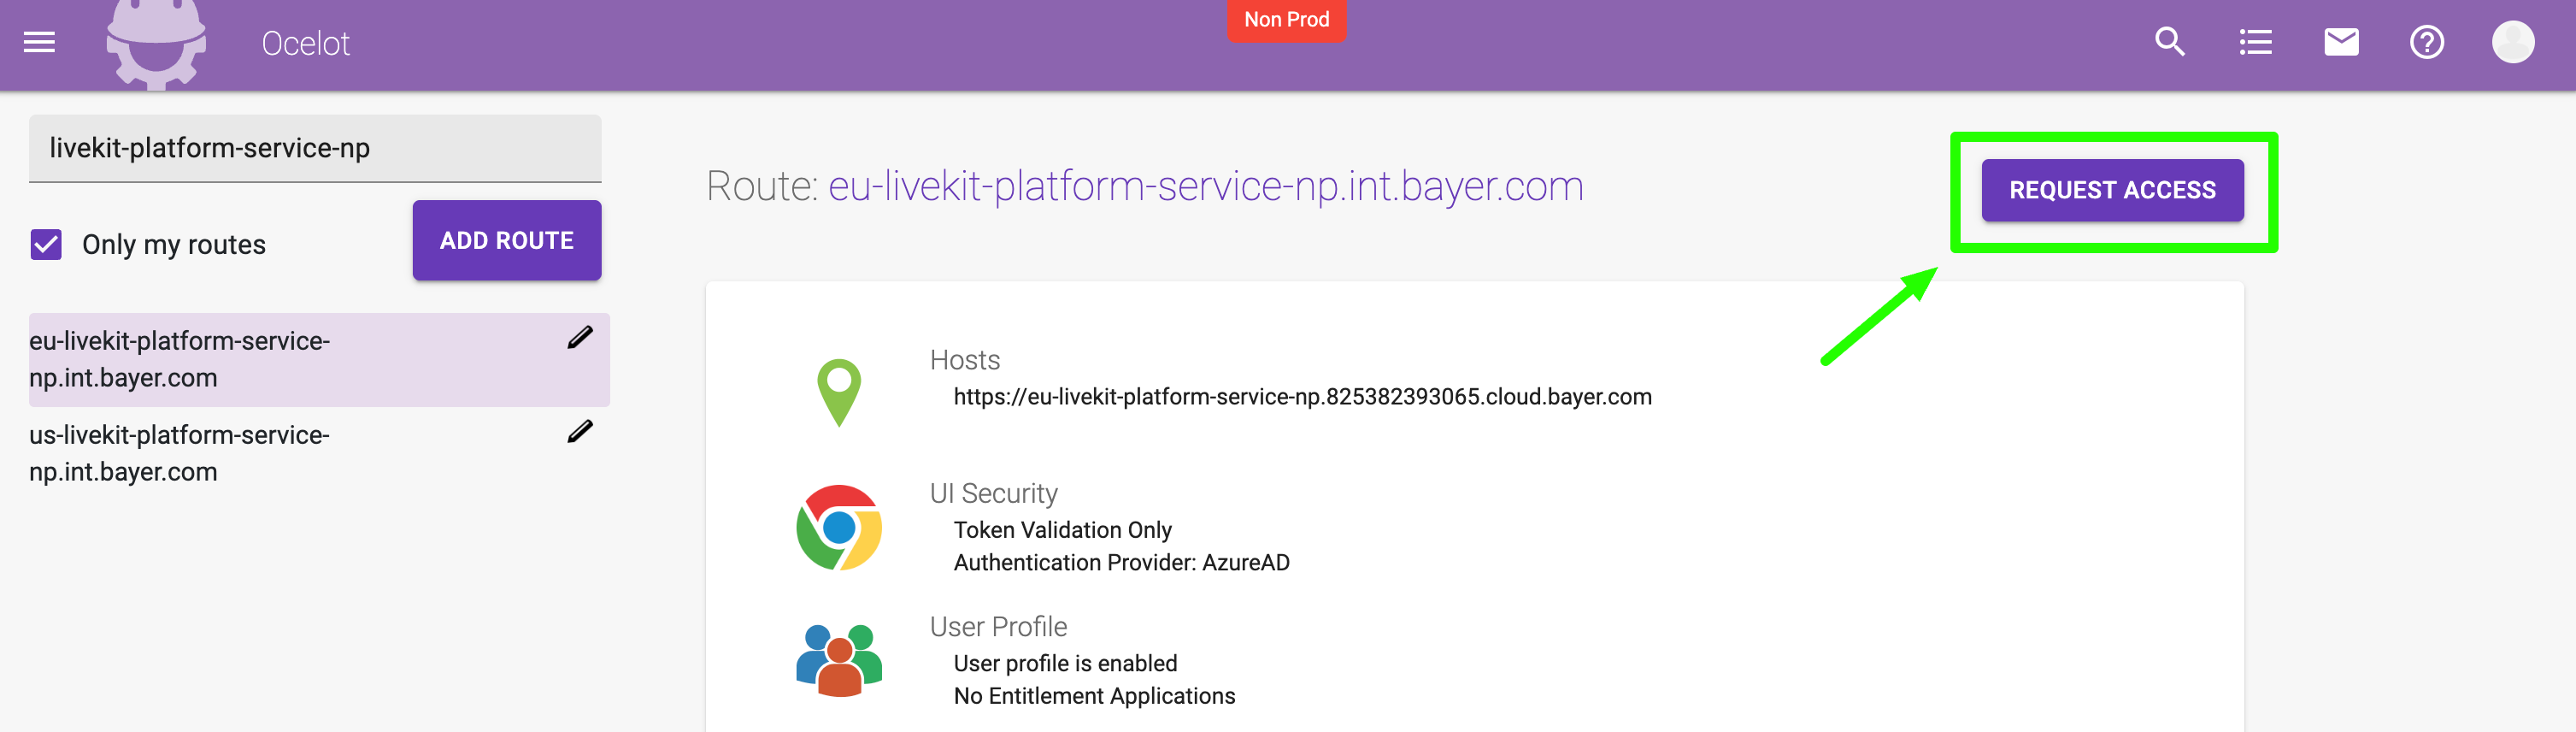
1.3 — Select Your Client Application
In the Request Access to Route dialog:
- Open the Client Application dropdown.
- Search for and select your Entra app registration (by name or client ID).
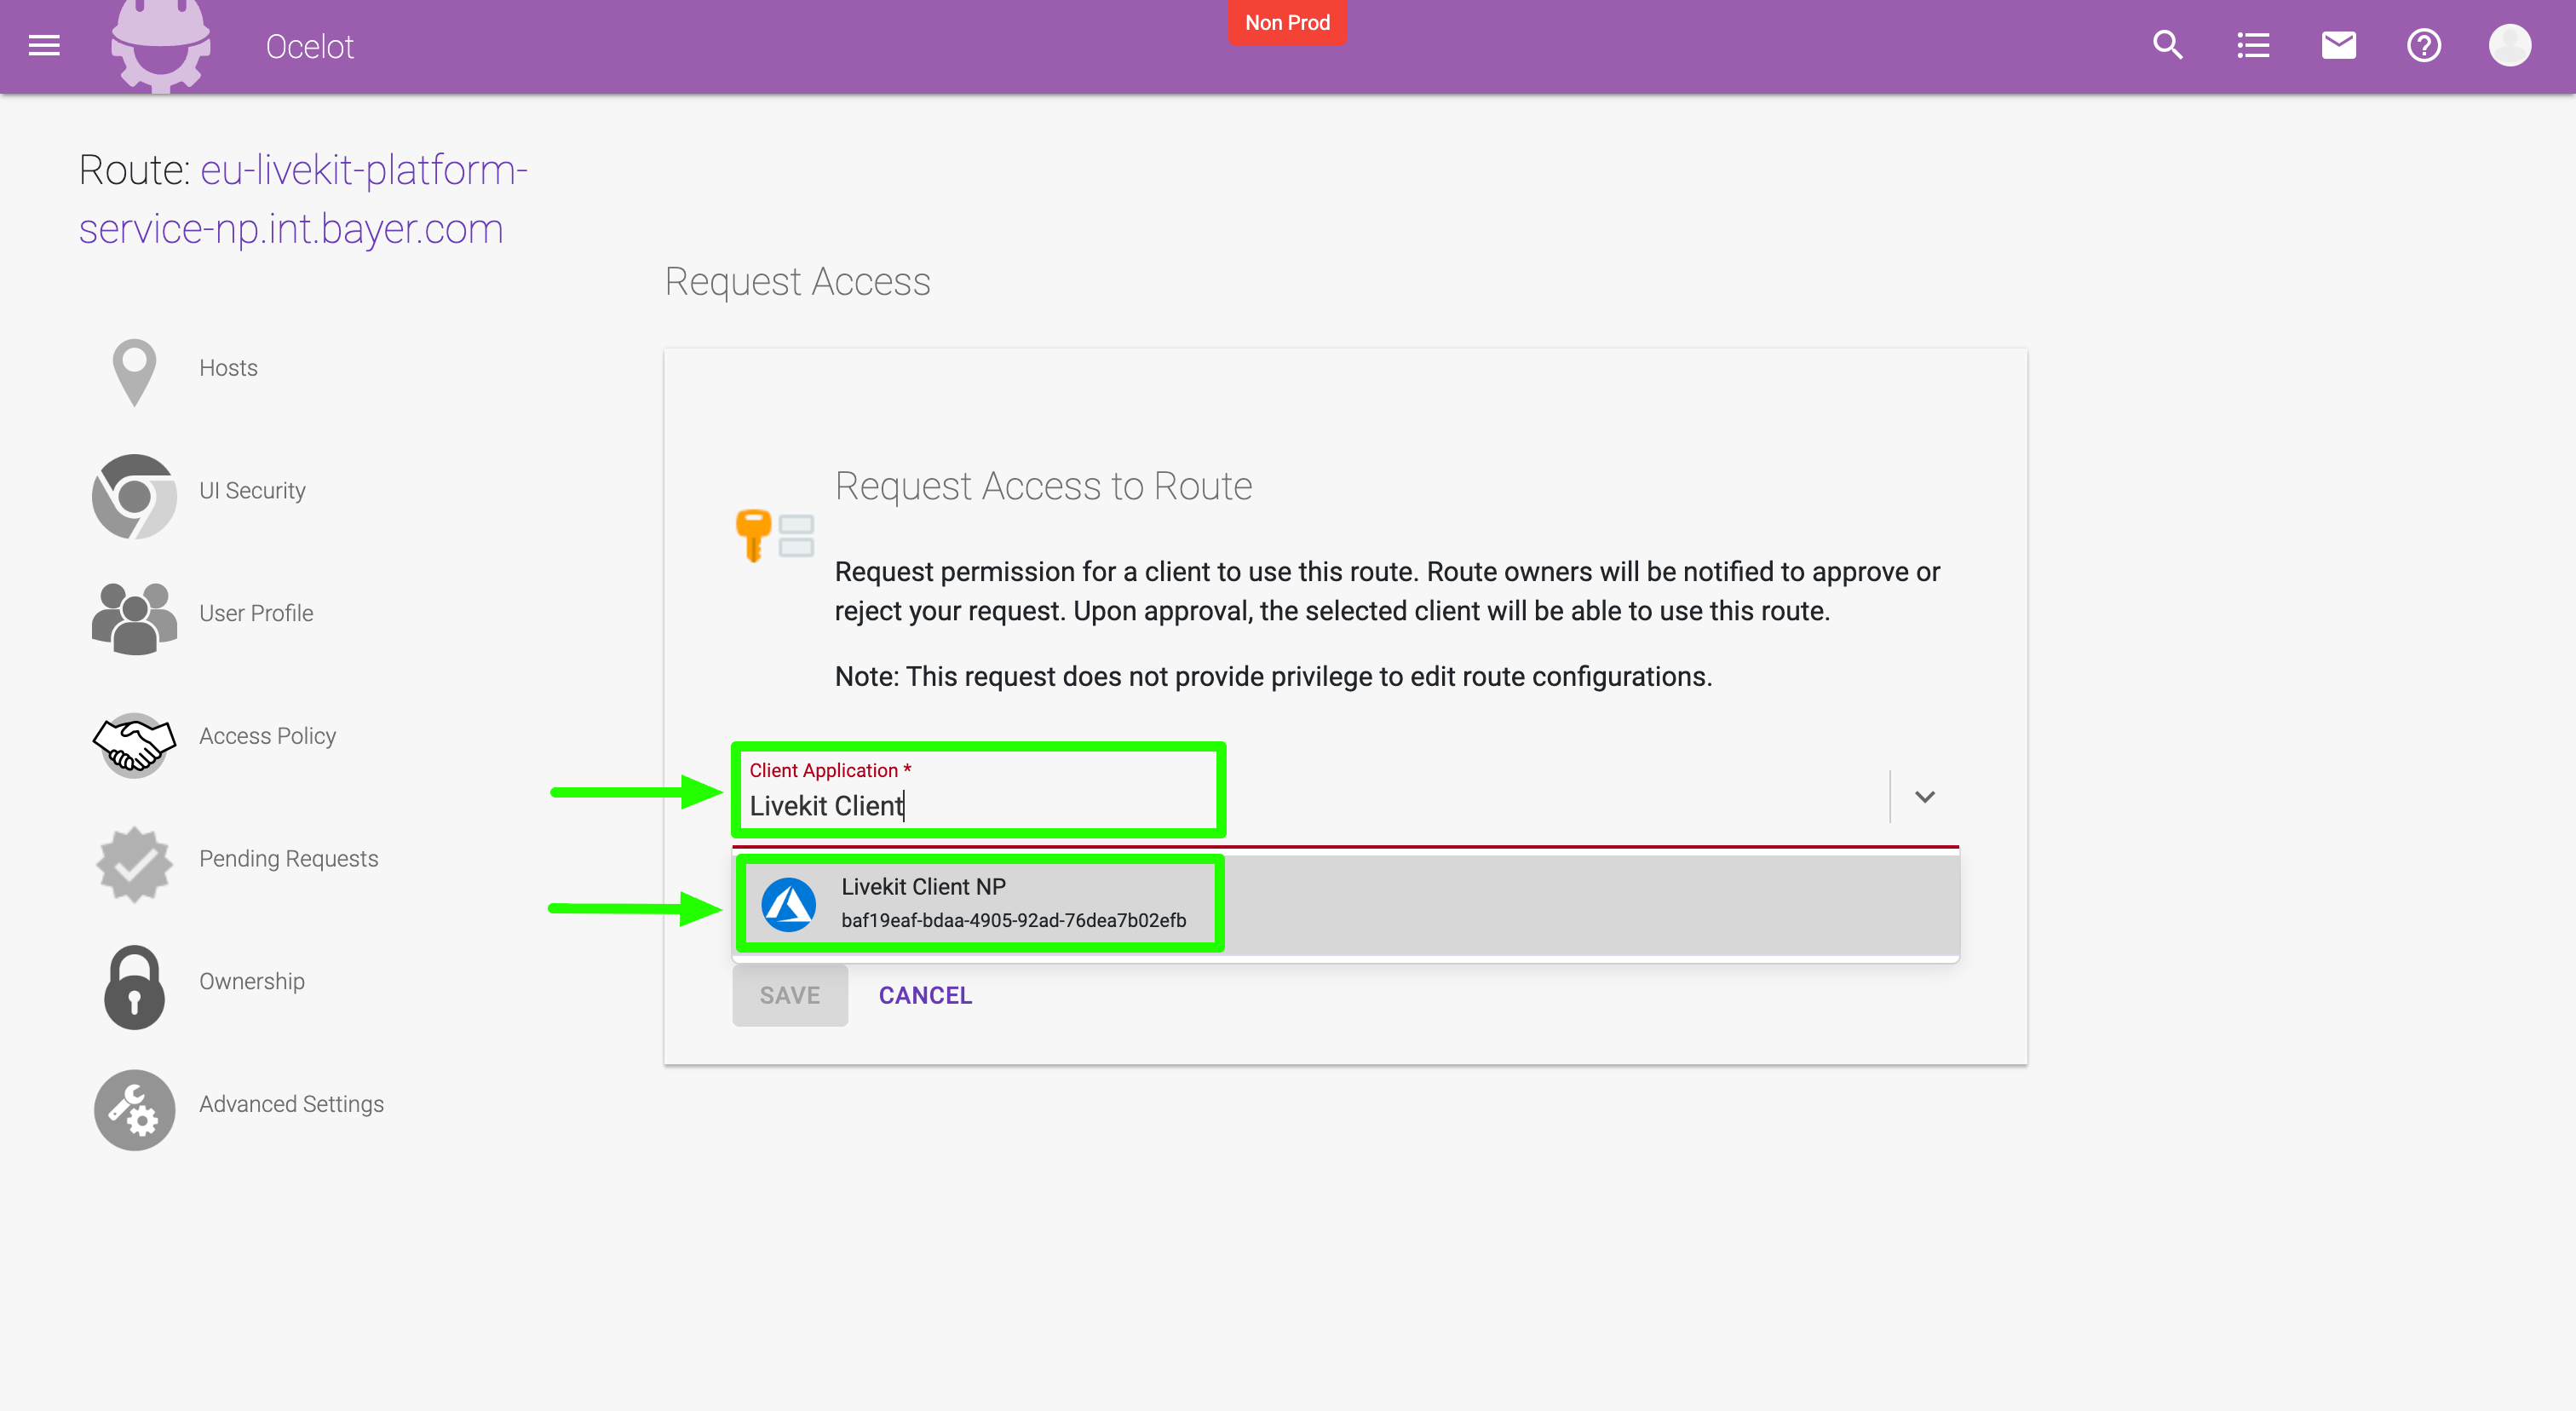
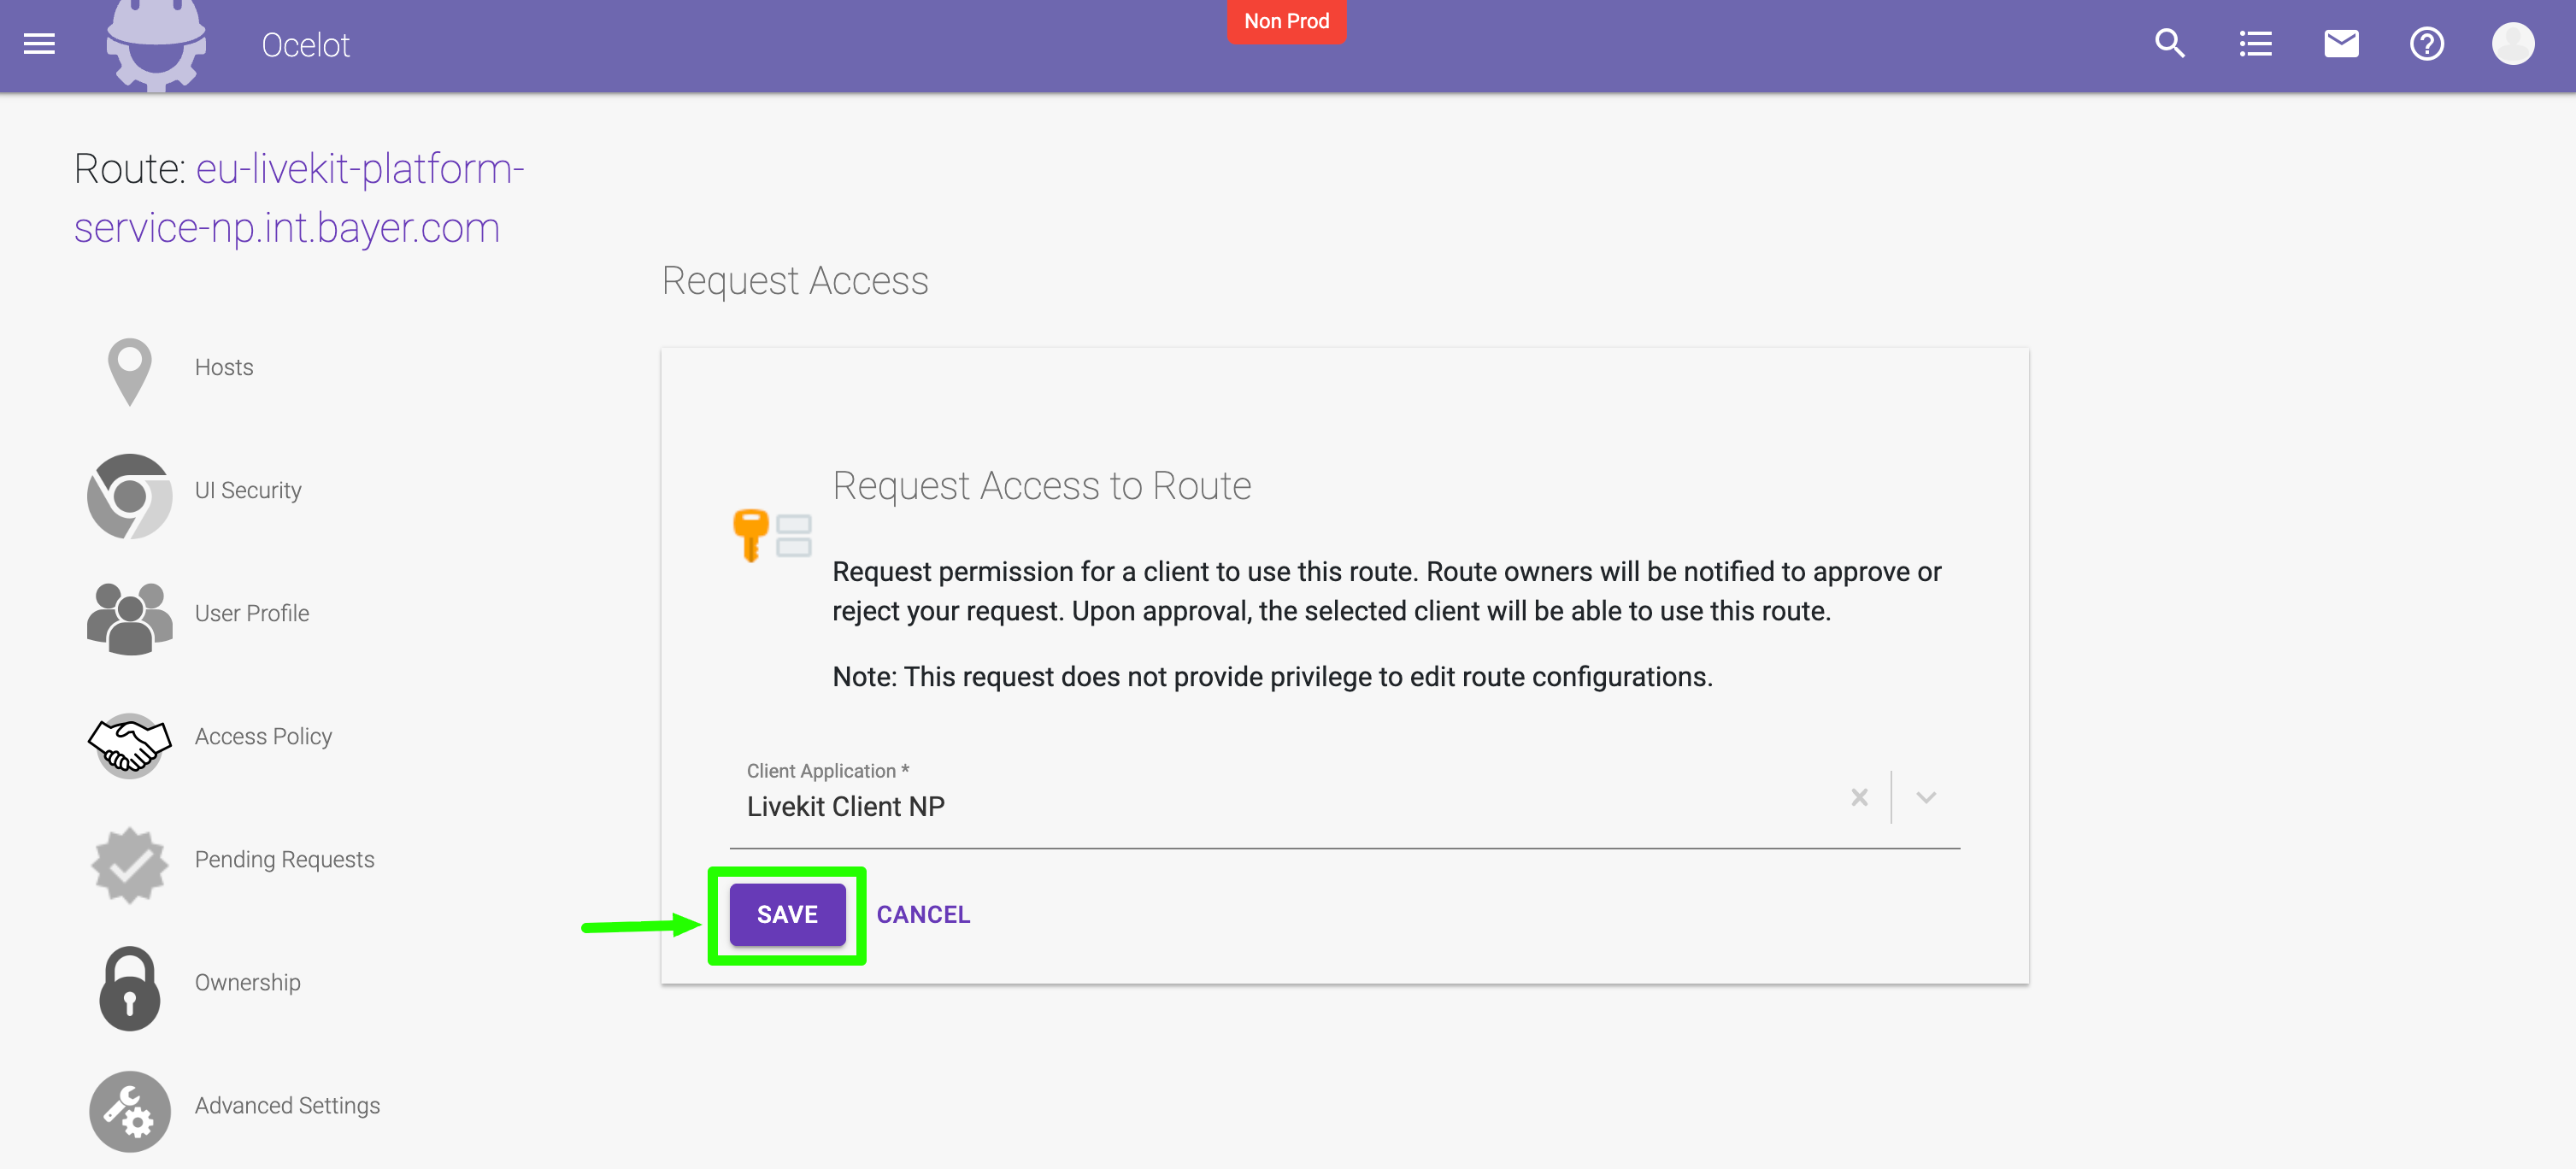
- Click SAVE to submit the request.
Note
Your Entra app registration must already exist and have at least one client secret, redirect URI, or federated credential configured — otherwise it will not appear in the dropdown. If you haven't created one yet, see Prerequisites — Step 2.
1.4 — Wait for Approval
After submitting, you will see a confirmation that the request was submitted successfully. The route owners (Bayer LiveKit Platform Dev Team) will be notified via email and will review your request.
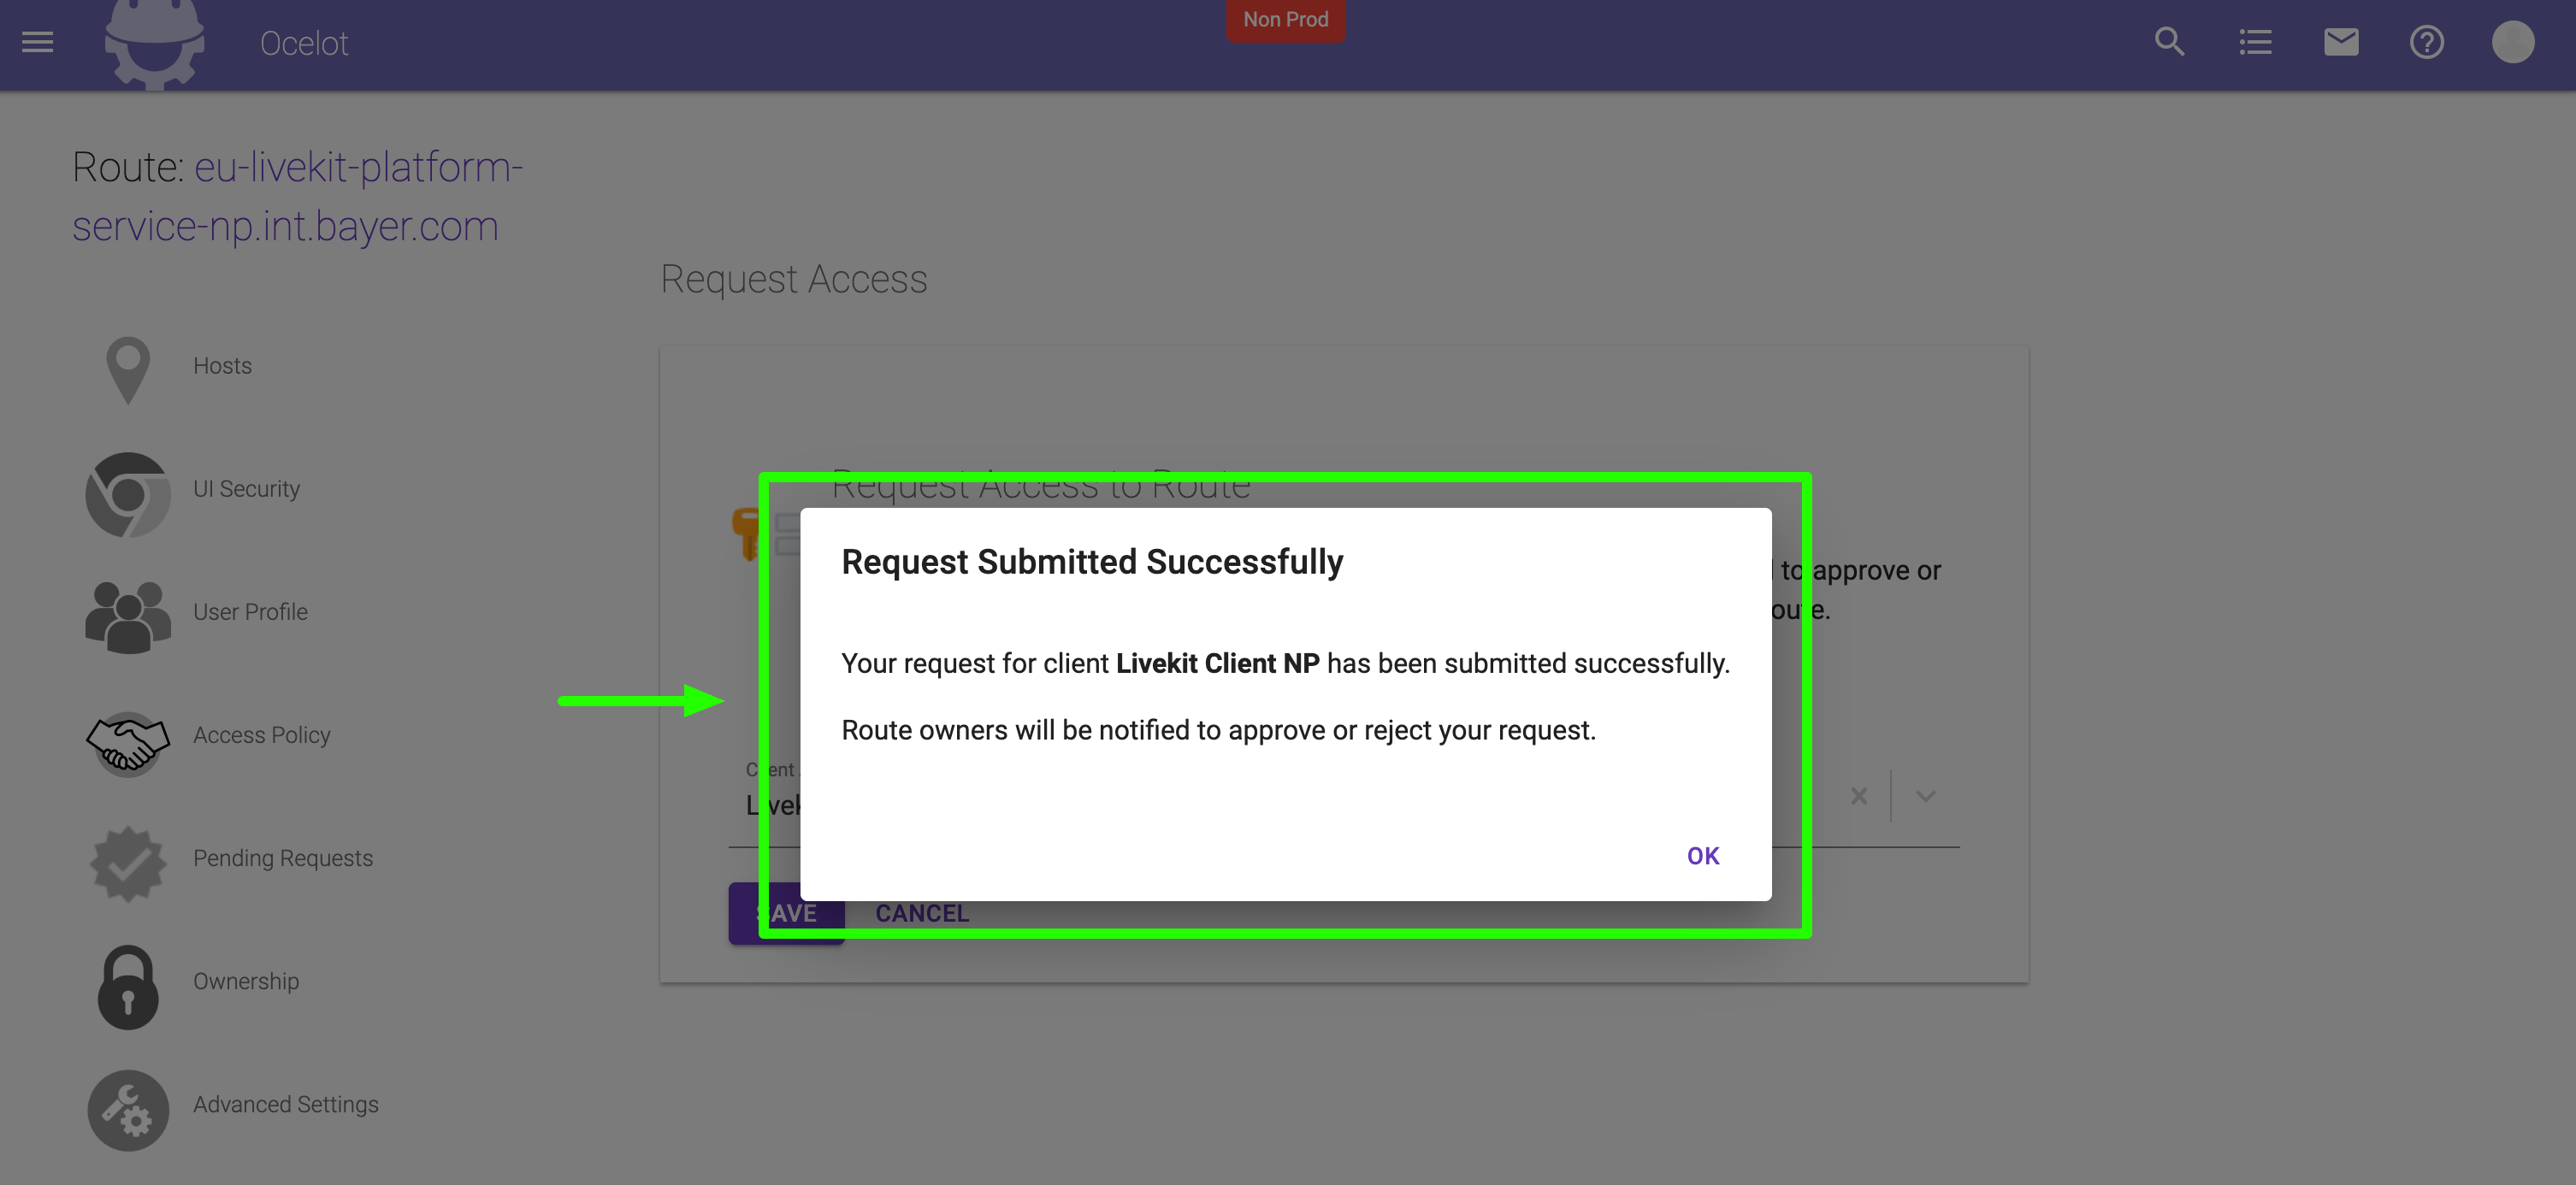
Once approved, your application's client ID will appear in the Approved Clients list on the route page.
Important
You need to request access separately for each environment and region you plan to use.
Note
Adding your client ID to the Ocelot route grants network-level access to LKPS. Application-level authorization (whether your client can connect to a specific agent) is controlled separately via Client-to-Agent Authorization.
Step 2 — Configure Your Application to Call LKPS via Ocelot
Once your client ID is added to the Ocelot route, configure your application to call LKPS through the Ocelot-protected URL.
Obtain an Entra ID Access Token
Your application must acquire a token targeting the LKPS API audience before making any API call.
Token request (client credentials flow):
POST https://login.microsoftonline.com/fcb2b37b-5da0-466b-9b83-0014b67a7c78/oauth2/v2.0/token
Content-Type: application/x-www-form-urlencoded

grant_type=client_credentials
&client_id=<your-app-client-id>
&client_secret=<your-app-client-secret>
&scope=api://livekit-platform-service-np.int.bayer.com/.default
| Parameter | Value |
|---|---|
client_id |
Your app's Entra client ID |
client_secret |
Your app's Entra client secret |
scope |
api://livekit-platform-service-np.int.bayer.com/.default (non-prod) api://livekit-platform-service.int.bayer.com/.default (prod) |
Make API Calls via Ocelot
Include the token in the Authorization header:
POST https://eu-livekit-platform-service-np.int.bayer.com/api/session/start
Authorization: Bearer <entra-access-token>
Content-Type: application/json

{
  "agent_entra_app_id": "426758d8-100a-4420-9ae2-5f17e44f7df4"
}
See Environments & URLs for the full list of LKPS endpoints per region and environment.
How Ocelot Authenticates Requests
When a request reaches Ocelot, it performs the following:
- JWT validation — verifies the token signature, issuer, audience, and expiration.
- Client Access List check — confirms the token's
appidclaim is in the route's authorized list. - Claims extraction — pulls identity information from the validated JWT.
- Header injection — adds the following headers to the forwarded request:
| Injected Header | Source (Entra JWT Claim) | Description |
|---|---|---|
user-id |
oid |
User's Object ID (for user-delegated tokens) |
client-id |
appid |
Application (client) ID of the calling app |
x-bayer-user |
email |
User's email address |
user-profile |
Assembled from claims | JSON object with firstName, lastName, displayName, email, user_id |
Note
LKPS trusts these proxy-injected headers and does not re-validate the Entra JWT. This is a standard pattern for services behind Ocelot.
Troubleshooting
401 Unauthorized
| Possible cause | Resolution |
|---|---|
| Expired or invalid Entra JWT | Ensure your token is fresh and targets the correct audience — api://livekit-platform-service-np.int.bayer.com for non-prod, api://livekit-platform-service.int.bayer.com for prod |
| Token does not target the LKPS audience | Verify the scope parameter in your token request |
403 Forbidden (from Ocelot)
| Possible cause | Resolution |
|---|---|
| Client ID not in the Ocelot route's Client Access List | Request access to the Ocelot route for your environment |
| Wrong environment | Ensure you are using the correct URL for your environment (non-prod vs. prod) |
403 Forbidden (from LKPS)
| Possible cause | Resolution |
|---|---|
| Client not authorized for the target agent | See Client-to-Agent Authorization — the agent owner must add your client ID to preAuthorizedApplications |
Unable to Access Ocelot UI
| Possible cause | Resolution |
|---|---|
| No access to the Ocelot UI | Request membership — join the Ocelot Users group via the DevTools application page |
Next Steps
| Next | Guide |
|---|---|
| Configure Entra ID for your agent or client app | Client-to-Agent Authorization |
| Start building an agent | Agent Developer Guide |
| Integrate a client application | Client Developer Guide |